


How Smart Merchandisers Handle Buyer Sample Rejections
Noor Ahmed Raaz
Specialized in Apparel Manufacturing
Owner and Editor in Chief Textile Merchandising
Asst. Prof., Department of Textile Engineering
Atish Dipankar University of Science & Technology
Email: textilemerchandising1@gmail.com
In garment manufacturing, shipping a sample is a major milestone. You spent days communicating with the mill, verifying fabric weight (GSM), auditing trim sheets, and checking every detail against the tech pack. But a few days after mailing the courier package, you open your inbox to see those dreaded words: “Sample Rejected – Comments Attached.”
If you have spent any time working in an export house or buying office, you know the feeling. However, handling buyer feedback is a routine, unavoidable part of textile merchandising. Samples are rejected for various reasons: minor pattern inaccuracies, unexpected fabric shrinkage after washing, incorrect shade matching under standard light sources, or simple communication gaps.
Learning to handle these corrections efficiently keeps your production on schedule and protects your factory’s bottom line. Here is a practical, step-by-step guide to navigating buyer rejections with real-world examples.
-
Breakdown of Common Sample Rejections
Buyers evaluate samples based on three main criteria: Fit/Measurements, Fabric/Color, and Workmanship/Construction. Knowing why a sample was rejected makes fixing it much faster.
|
Rejection Category |
Real-World Scenario / Example |
What Went Wrong? |
The Solution |
|
Fit & Specs |
Buyer comment: “Chest width |
The pattern master did not account |
Adjust the master pattern block, |
|
Color / Lab Dip |
Buyer comment: “Shade appears |
The dye house matched the swatch |
Re-submit lab dips tested strictly |
|
Fabric Hand feel & Weight |
Buyer comment: “Fabric feels |
Target GSM was 180, but unwashed/unrelated |
Work with the knitting/dyeing unit |
|
Workmanship & Trims |
Buyer comment: “Puckering |
Incorrect machine tension or |
Conduct a mini Pre-Production (PP) |
-
A Step-by-Step Action Plan for Merchandisers
When an email containing negative buyer feedback arrives in your inbox, taking immediate, structured action prevents chaos on the factory floor and keeps your order on schedule. Instead of forwarding raw, confusing emails to your technical team, follow this comprehensive 4-step workflow to turn rejections into clean, approved samples.
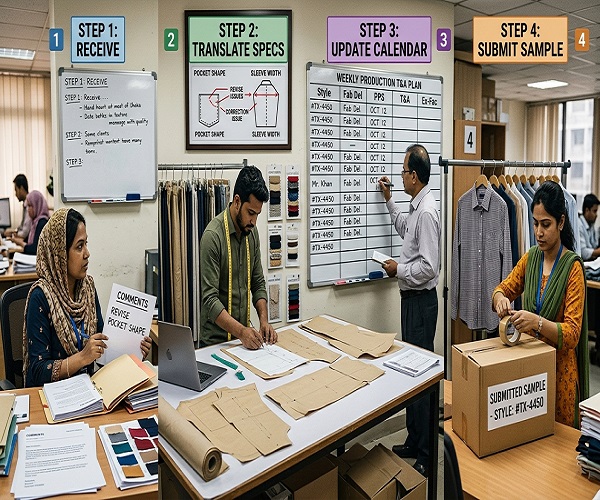
Step-by-Step Action Plan for Merchandisers
Step 1: Translate the Buyer’s Feedback for the Floor
Buyers and factory floor managers communicate in two entirely different languages.
- Buyers speak in commercial, aesthetic, and retail terms (e.g., “The garment looks boxy,” “The drape feels stiff,” or “The neck sits funny”).
- Factory Technicians, Pattern Masters, and Sample Room Chiefs speak in structural, mathematical, and machinery terms (e.g., “Pattern balance,” “Seam allowance,” “Stitch per inch (SPI),” and “Needle gauge”).
As a professional merchandiser, your primary job is to act as a technical translator. If you simply pass a buyer’s vague design note to the pattern maker, you invite misinterpretation, trial-and-error mistakes, and wasted fabric.
Real-World Translation Scenarios:
- Scenario A — Fit Adjustment:
- What the Buyer Says: “The drop shoulder looks awkward, feels heavy, and hangs way too low on the arm.”
- What You Translate to the Pattern Master: “Reduce the total shoulder slope by 1.5 cm, raise the armhole seam by 1 cm, and adjust the sleeve crown height accordingly to restore natural balance.”
- Scenario B — Seam Integrity & Puckering:
- What the Buyer Says: “The side seams look wavy and distorted after ironing.”
- What You Translate to the Sewing Floor Supervisor: “The seam puckering is caused by excessive differential feed tension. Reduce thread tension on the 4-thread overlock machine, change to a finer #11 ballpoint needle, and ensure operators do not stretch the fabric while feeding.”
- Scenario C — Collar Construction:
- What the Buyer Says: “The shirt collar collapses and loses its structure when unbuttoned.”
- What You Translate to the Cutting & Fusings Team: “The interlining GSM is too weak for this shell fabric. Switch from non-woven 35 GSM fusings to a woven 55 GSM fusings with proper temperature and dwell time during thermal bonding.”
Step 2: Create High-Impact Visual Markup Files
Never forward a buyer’s text-only email directly to your sample room. Text instructions are easily overlooked or misunderstood by busy operators on the floor. Always convert text feedback into an annotated, high-definition Visual Revision Sheet.
How to Prepare a Professional Visual Markup:
- Capture High-Resolution Photos: Lay the rejected physical sample flat on a clean measuring table under bright, neutral white lighting.
- Add Precise Callouts & Annotations: Use clear graphics software or tech pack software to draw bold red arrows, circle problem zones, and lay down digital measurement rulers.
- Compare “Actual” vs. “Requested”: Side-by-side visual comparisons eliminate guesswork. Show the buyer’s original spec next to your physical measurement photograph.
- Attach Physical Swatches or Paper Patterns: If the comment involves print placement, embroidery scale, or thread color, pin physical swatches or CAD cutouts directly onto the sample before handing it over to the floor team.
Example Visual Correction Template for Your Tech Pack:
|
Garment Zone |
Buyer Comment |
Root Cause Analysis |
Actionable Floor |
Visual Reference |
|
Front Placket |
“Placket is wavy and pulling.” |
Incorrect interlining tension during fusing. |
Re-calibrate fusing machine to 135°C at 2.5 bar pressure |
Annotated photo showing placket waviness with red callout |
|
Pocket Placement |
“Chest pocket sits too high.” |
Marking template placed incorrectly by sample cutter. |
Shift pocket placement down by 2 cm from the high shoulder |
Side-by-side photo: Original placement vs. New template |
|
Neck Ribbing |
“Neckline gaping/loose.” |
Neck rib length too long compared to neck opening. |
Shorten rib cut length by 1.5 cm and apply 1:0.85 stretch |
Measurement photo showing neck circumference overlay. |
Step 3: Recalculate Your Time & Action (T&A) Calendar
Every sample resubmission introduces a delay of 5 to 10 working days, depending on fabric availability, dyeing lab schedules, and sample room capacity. Unmanaged sample delays cascade down the supply chain, threatening your Planned Cutting Date (PCD), Inline Sewing Schedule, and ultimately your Ex-Factory Delivery Date.
When a rejection occurs, execute this T&A recovery strategy immediately:
- Map out the Delay Matrix
Calculate the exact time required for each phase of the re-sampling process:
- Pattern Correction & CAD Printing: 1 Day
- Fabric Sourcing / Lab Re-Dyeing / Washing: 2–3 Days
- Sample Sewing & Quality Inspection: 1–2 Days
- International Courier Transit: 3–4 Days
- Total Resubmission Delay: 7–10 Days
- Identify Buffer Days in Your Critical Path
Look ahead at your master schedule to recover lost time without rushing bulk sewing:
- Fabric Mill Lead Time: Can the mill fast-track bulk fabric finishing by running parallel batches?
- Trim & Accessory Delivery: Can buttons, care labels, and polybags be shipped via air freight instead of sea freight to reclaim 4 days?
- Staggered Cutting: Can you begin cutting body panels for approved sizes while waiting for the final approval on nested size grading?
- Proactive Buyer Communication Script
Never wait until the deadline day to inform the buyer of a delay. Inform them early with a clear, solution-oriented recovery plan.
Professional Buyer Email Template:
“Dear [Buyer Name],
Thank you for the detailed feedback regarding the Fit Sample for Style #[TX-4450]. We fully understand your notes on raising the armhole and refining the shoulder slope.
Our technical team has already revised the master block. To ensure the revised sample reflects 100% accurate drape and measurements, we are preparing a fresh piece with washed production-quality fabric. This resubmission will require an additional 4 working days.
To protect our final Ex-Factory date of [Date], we have adjusted our bulk fabric finishing schedule and prioritized trim delivery. Our Planned Cutting Date (PCD) remains secure, and there will be no impact on final shipment.
We will dispatch the revised Fit Sample via express courier on [Date] and share the tracking number immediately.
Best regards,
[Your Name] | Senior Merchandiser”
Step 4: Execute a Rigorous Pre-Shipment Sample Audit
The costliest mistake a merchandiser can make is sending a corrected sample that still contains basic errors. Never let your sample room pack and dispatch a sample directly to the courier without your personal, hands-on audit.
The Merchandiser’s 5-Point Pre-Shipment Audit:
- Dimensional Spec Check: Lay the garment flat and measure every point of measure (POM) against the updated tech pack using a flexible fiberglass tape. Log measurements in your internal quality sheet.
- Symmetry & Balance Audit: Fold the garment along center lines to check shoulder alignment, sleeve armhole symmetry, collar points, and hem levelness.
- Shade & Light Box Verification: Inspect fabric shade, thread color matching, and print strike-offs inside a standardized color cabinet under the buyer’s specified illuminant (D65 Daylight, TL84 Store Light, or CWF Cool White Fluorescent).
- Workmanship & Finishing Check: Inspect inside seams for loose threads, missing lock-stitches, crooked labels, or needle holes. Ensure proper steam pressing without shine marks.
- Documentation & Tagging: Attach a complete Sample Tag stating the Style Number, Season, Sample Stage (e.g., Fit Sample #2), Date, and precise list of incorporated corrections. Include a printed copy of the updated spec sheet inside the package.
-
Key Sample Stages Every Merchandiser Must Track
To build a reliable garment manufacturing process and stop rejections before they disrupt mass production, track and secure written buyer approvals through this strict chronological sequence:
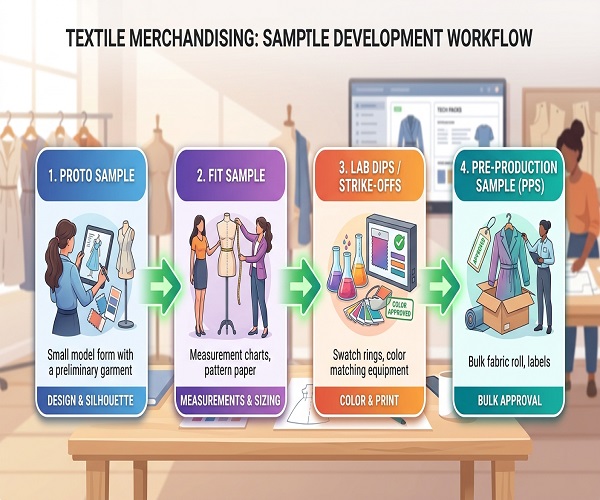
Sample Stages
- Proto Sample (Prototype)
- Primary Focus: Conceptual design, silhouette, basic proportions, and aesthetic vision.
- Fabric & Trims Used: Available stock or substitute fabrics with similar weight and drape; close match trims.
- Merchandiser Strategy: Use this stage to identify potential construction hazards early. If a seam detail looks overly complex or prone to high defect rates in line sewing, propose a simplified alternative to the buyer now.
- Fit Sample
- Primary Focus: Precise body fit, size chart grading, measurement tolerances, and ergonomic comfort.
- Fabric & Trims Used: Actual production-quality fabric (or correct weight/composition base cloth) with standard production trims.
- Merchandiser Strategy: Ensure the sample is washed and relaxed before sewing to account for real-world dimensional changes. Always test the fit on a physical dress form/fitting mannequin as well as a live fit model if required by the buyer.
- Lab Dips, Strike-Offs, & Mock-Ups
- Primary Focus: Color accuracy, print screen registration, embroidery density, wash effects, and trim color matching.
- Fabric & Trims Used: Actual bulk fabric substrate and production dyes/inks.
- Merchandiser Strategy: Always submit A, B, and C shade options ranging from slightly lighter to slightly darker than the target swatch. This gives the buyer flexibility while staying within workable factory dye tolerances.
- Pre-Production Sample (PPS)
- Primary Focus: Final factory trial run, bulk production feasibility, labeling, tags, and packaging compliance.
- Fabric & Trims Used: 100% actual bulk fabric, production trims, brand labels, price tags, polybags, and cartons.
- Merchandiser Strategy: The PPS represents the exact product that will land on retail shelves. Golden Rule: Bulk fabric cutting must NEVER start until the Pre-Production Sample is formally approved in writing by the buyer.
-
Comprehensive Checklist for Textile Merchandisers
Keep this quick reference guide pinned above your workspace or saved in your digital order files:
- Self-Inspect Every Piece: Measure and inspect every sample against the latest tech pack before packing. Never rely solely on sample room claims.
- Verify Light Cabinet Settings: Check color dips and shade bands strictly under the buyer’s requested primary light source (D65, TL84, UV, CWF).
- Maintain an Order Master File: Store every buyer email approval, tech pack version, lab dip approval swatch, and revised spec sheet in a single centralized folder.
- Translate, Don’t Forward: Convert aesthetic design notes into technical factory instructions with visual callouts before giving work to pattern makers or line supervisors.
- Protect the T&A Calendar: Update your critical path immediately after any revision. Communicate schedule adjustments to buyers early alongside a concrete recovery plan.
- Enforce the PPS Cutting Lock: Never allow the cutting department to lay bulk fabric until you hold an official, written PPS approval from the buyer.
Conclusion
Navigating buyer sample rejections is not about avoiding mistakes altogether it is about managing revisions with technical precision, clear communication, and systematic execution. By taking control of the feedback process, translating comments effectively for your factory floor, and strictly auditing every resubmission, you transform potential production crises into smooth, profitable order executions.

Mohammad Noor Nabi, known by his author name Noor Ahmed Raaz, is a PhD Fellow at Bangladesh University of Textiles (BUTEX) and the Founder & Editor of Textile Merchandising. He is also an Assistant Professor of the Textile Engineering Department at a renowned university in Dhaka, Bangladesh. His research focuses on textile innovation and sustainability. Awarded the Research & Development Fellowship thrice from the Ministry of Science & Technology in Bangladesh, Noor Ahmed Raaz is dedicated to advancing textile engineering through education, research, and industry collaboration. For inquiries or collaborations, contact Noor Ahmed Raaz via email at textilemerchandising1@gmail.com or WhatsApp at +8801673758271.